0

Paper Christmas Tree Ornaments

This year we are keeping all those christmas tree ornaments in storage and forgetting about buying new ones. How about D.I.Y all season long. Today it’s all about paper christmas tree ornaments. Yes that’s right paper. Making paper christmas tree ornaments can be fun and inexpensive.  You can use paper in the colour and pattern of your choice to go with a scheme you may have in mind. You can also do patterned or plain paper, or even a mixture of both. There are several techniques that can be used to create these ornaments, basic origami being my favorite, simple because you can manipulate the paper into various shapes. Check out these AMAZING tutorials we found online.

paper-spaceship-ornament

I really like the shape of this striped paper ornament. It sort of looks like a flying saucer.  Check out the detailed and easy to follow tutorial at How About Orange

diy paper ornaments1

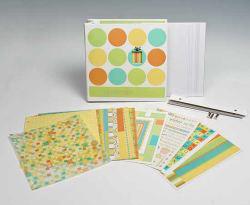
This decorated paper box idea is really neat.  These boxes can also be personalize with photos of your family. Check out the tutorial at Unify Handmade.

timthumb

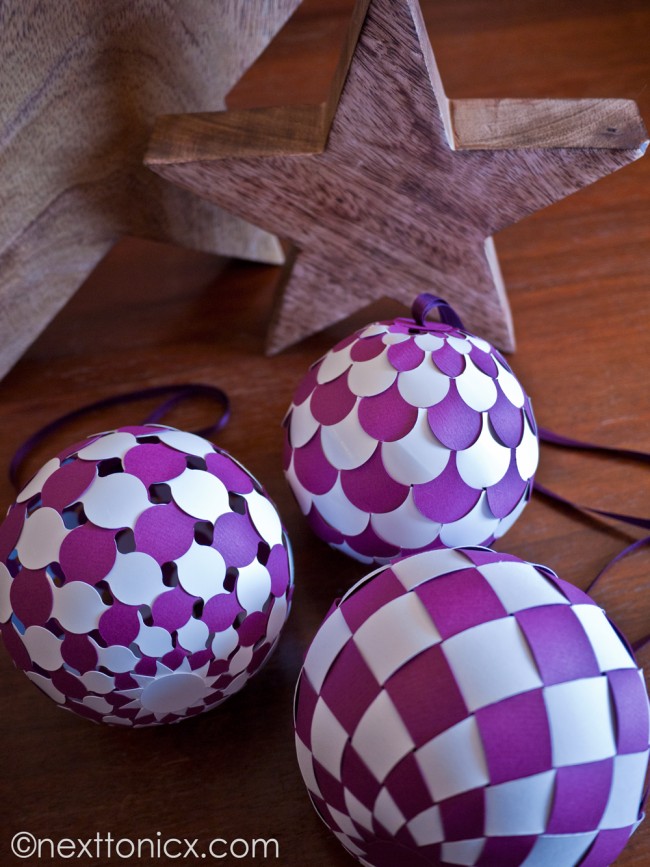
These woven paper baubles will sure impress your family when they come to visit. It takes a little more time than the average paper ornament to create but the finish product is definitely worth it. Next to Nix website shows how to make all three designs

3113913717_d84e358594

This paper heart-shaped ornament is just too cute.  Christmas is all about spreading love and this ornament sure represents that. Take a look at the tutorial at Resse Dixon.

origami-decorations-3

These Origami hanging decorations are a must try this season. Imagine how sleek these would look on your tree. Check out the easy to follow tutorial on mini-eco.co.uk

IMG_1215-001

These paper Christmas tree ornaments can also be hanged around the house. You can make them as big or small as you like using the same technique. See the tutorial at De Stampin Corner

pinterest

Check out our Pinterest Board “Paper Crafts” to see more wonderful Ideas.

downloadFind us on Facebook.BeadCafeCrafts

Thanks for joining us for another Make it Monday Moment, and we hope you will be making your own ornaments this christmas. Look out for Friday’s post where we have some inspiring ideas on Recycled Christmas Tree ornaments.

0

Make it a Tote Box!

Stop, do not throw away that box! Let us make a decoupage tote box.

What do you need?

  • Box
  • Scrap paper from old magazines, books, catalogues, newspapers, invitations or cards
  • Mod Podge
  • Brush
  • Scissors or any cutting tool such as a Hobby Knife or paper punch. You can also tear the paper.

Step 2: Select scrap paper, you can use a sheet the size of the side of your box  or you can cut the paper to your desired shape and size.

 I used an old scrapbook catalogue that had wonderful prints. I cut the paper in strips and cubes.

20130915-115814.jpg

STEP 3: Apply a layer of Mod Podge on to a small area of the box and press paper, rubbing out any air bubbles.  You can use use your hands or a squeegee to smoothen the paper. 

I used Mod Podge Antique Matt for an aged look. I started from the bottom corner and continued to stick the paper covering the surface. Then I covered the entire surface with my Mod Podge. Mod Podge is both an adhesive and a sealer. You can use regular Mod Podge Matt or Gloss and it dries clear.

20130915-115840.jpg

20130915-115853.jpg

Step 4: Embellish

I used Washi Paper ( an adhesive patterned paper) to cover the inside. I also punched holes and used hemp to make straps. I also used buttons and ribbon for added detail. You can use brads, stickers, beads, eyelets and so much more to decorate your tote box.

20130915-115752.jpg

I hope you enjoyed this project from us at Bead Café and remember ‘express, explore, enjoy and create’, our Motto at Bead Café.

Crafty T

www.beadcafett.com

1

D.I.Y. Picture Frames. Make your walls POP!!!

Picture frames are a great way to display your memories.  Making your own frames helps to personalize your home decor. You can take your old picture frames and up-cycle them or create your own frame from scratch.

DIY Picture Frame

Here is a link on how to make a picture frame at home. Woodooz

pin-frames

Stenciled Photo Frame. Shanty 2 Chic Both easy and cost effective to make.

Button-Frame

Buttons can be a great embellishment for your frames. I’m sure you have buttons just laying around the house. Check out this basic tutorial. Fave Crafts

DIY-Cardboard-Frames

These frames were made by 36th Avenue for a party, out of cardboard. I think these are awesome. The Pops of colour can bring your party to life.

5-diy-kids-frames

Dinosaur Frames for kids. This is an easy one kids can do to add some personality to their rooms. Hand Made Charlotte 

bean_frames_0105

Bean frame idea this is also a great one for the kids to do.  Some beans from the pantry, acrylic paint and your read to get started. Blogglebeans

Frame-1

Easy decoupage frames. Fave Crafts

DIY Washi Tape Frame

Washi Tape Frame Tutorial. Ashley’s Dandelion Wishes

pinterest-logoDIY Picture Frame Ideas from our Pinterest Board

Make it Monday is brought to you by Bead Café Craft and Hobby. Join us every Monday for more ideas.

0

Make it Monday with Washi Tape

Happy Monday everyone.  It has been a rainy morning but don’t let the rain wash away your creativity and fun.  Today it is Make it Monday with…….WASHI TAPE. Before we look at some cool tutorials I would like to share some info with you about what is washi tape for those of you who may not know what it is. .

DSC_0913_copy_copy

The whole washi tape phenomenon started in 2006.  Washi Tape started in Japan but manufacturing has now spread throughout the world.  It is typically made from natural fibers, such as bamboo,rice or hemp, but most commonly from the bark of trees that are native to Japan — the mulberry, the mitsumata shrub or the gampi tree.

It is a paper tape that comes in pretty colors and patterns. It comes on a roll like regular sticky tape, and is often translucent. You can find it in 1/4″ widths up to 2 1/2 inches. Washi tape is similar to masking tape or blue painters’ tape in that it is easy to stick and restick in case you don’t get the placement perfect each time. This tape is versatile, fun and easy to use in many crafting projects. Washi Tape is available at Bead Cafe Arouca and Bead Cafe Craft and Hobby.

1

By: The Glamorous House Wife. View Tutorial 

2

DIY Washi Tape Laptop Keyboard by:- Her New Leaf. View Tutorial

3

DIY Washi Tape Phone Cover by:- Zakka Life. View Tutorial

4

 Washi Tape Bunting & Cake Plate by:- Sugar and Cloth . View Tutorial

5

Wall Art by:- Living Locurto. View Tutorial

Make it Monday is brought to you by Bead Café Craft and Hobby. Join us every Monday for more ideas.

6

Make it Monday – Scrapbooking

A Scrapbook is a keepsake, a decorated photo album that preserves the stories behind the photos (called journalling). A scrapbook can be made of pictures, stories and memorabilia such as tickets, certificates and letters. You can create a scrapbook for your family history or different events such as vacations, a baby’s first year, a holiday, birthday, anniversary and home improvement . Your scrapbook can become a treasure for many years, telling a story, preserving a memory and recording history.

A few materials you will need to start creating:

Card-stock, decorative papers, paper bags, glue, mod podge, washi tape, craft knife, ruler, punches and stamps are a few things you can use  in creating a scrapbook.

You can add embellishments to make your scrapbook POP! Stickers, glitter, paint, decals, ribbon, twine, rub-on transfers, letters, tags, quotes, eyelets, ribbons, fabric and stickers,  all of these you can add to your layouts, the list is endless let your imagination take over.There are many different techniques and products. It all depends on your own style. There is no wrong in this Hobby.

Here are a few Tutorials we found online.

1

Tutorial by : Burst of Creativity

4

Vacation themed Scrapbook Tutorial shared by: Polka Dot Chair

2

Paper bag  Scrapbook Tutorial shared by: Do Stamping

3

Scrapbook made with Envelopes

How cool is this, click on link to see tutorial by: Madonna Dunn

5

D.I.Y. Mini Scrapbook

Great one for the kids. Tutorial by: Crissys Crafts

Here are a some of the supplies available for Scrapbooking at

Bead Cafe Craft & Hobby.

390125_431147883618346_2132463602_n 601194_466062946793506_895340235_n 63112_423869907679477_1997347406_n 270480_426932640706537_1935756554_n 20513_449878088411992_1095552003_n 380739_448634695202998_725416835_n

Make it Monday is brought to you by Bead Café Craft and Hobby. Join us every Monday for more ideas.

0

Make it with Polymer Clay

wpid-20130513_110247.jpg

Polymer Clay Charms

Enjoy the versatility of Polymer Clay for your craft projects. Polymer clay is a synthetic modelling material, which means it is not a type of clay that comes from the earth. It is actually formulated from polyvinyl chloride (PVC), dyes or pigments and plasticisers to keep it soft until heat cured. It is an acrylic art material.  All polymer clays are thermal set plastics, meaning they are hardened with heat and do not become soft again after curing. Polymer clay comes in various brands and many different colours. We at Bead Cafe carry Sculpey III and Sculpey Premo.

Polymer-Clay-Blog-300x3004682199732_c801efa879_z

Sculpey Premo – After conditioning this clay is soft enough to blend easily but firm enough to hold fine detail and for specialized techniques. It’s perfect for caning, mokume gane and mica shift. Because Premo retains flexibility, the finished product remains very strong and durable.  It is great for making millefiore beads and canes, delicate scrapbook pages, faux semi-precious stones or glass adornments.

Sculpey III – maintains tooling and detailing beautifully. Once cured, Sculpey III bakes hard and takes on a matte, bisque-type finish. It’s easy-to-use and stays soft until you bake it. Sculpey III is perfect for figurines, home decor, beads, charms and seasonal items. Sculpey III is great for beginners as it is a softer clay which makes it easier to work with.

Here are some great tutorials we found online.

stone_header

Faux Stone Beads

To create these Faux Stone Beads you need translucent polymer clay and whatever inclusions you have on hand such as colourful sand, dried flowers or leaves, embossing powder and dried herbs from the kitchen cabinet.  The possibilities are endless, visit Polymer Clay Web to view their Faux Stone tutorial.

polymer clay photos 016Spiral Cane Bead Tutorial 

The spiral cane is a simple cane that is ideal for beginners. The Bead Shop in Nottingham shares this post http://mailorder-beads.blogspot.com/2011/09/polymer-clay-tutorial-spiral-cane.html

polymer-clay-turtle-box

Turtle Box Tutorial 

These are a nice gift idea,  fun to make and you can have the kids help with this project.

http://polymerclayworkshop.com/2013/04/02/polymer-clay-turtle-box-tutorial/

photo3

Ombre Herb Garden Markers Tutorial

.  With a few simple craft supplies you can create this sweet herb garden markers.

http://www.humblebeadsjewelry.com/blog/ombre-herb-garden-markers-tutorial

Here Are Some Inspirational Pieces 

polymer_clay_cookie_charms_by_pale_swan-d3jvk79

Cookie Charms – http://pale-swan.deviantart.com/art/Polymer-Clay-Cookie-Charms-for-sale-214783749

polymer-clay-earrings-handmade-polymer-clay-earrings-chinese-knot-earrings-chinese-button-earrings-vintage-lucky-earrings-Favim.com-481385

Chinese Knot Earrings – http://favim.com/image/481385/

polymer-clay-jewelry-tutorials2

Polymer Clay Bangle – http://craftstew.com/

Polymer_Clay_jewelry_boxes_by_AHHA

Jewellery Box – http://ahha.deviantart.com/art/Polymer-Clay-jewelry-boxes-154814995

polymer-clay-necklace-tutorial

Leaf Necklace – http://www.sculpey.com

0243.EugenaTopina-faceted-polymer-clay-bead.JPG-550x0

Faceted Beads – http://www.polymertutorials.com/

Make it Monday is brought to you by Bead Café. Join us every Monday for more ideas.

1

Toilet Makeover

Hi crafty friends,

It is Make it Monday and we are featuring a makeover, the Bead Cafe Craft & Hobby store toilet.  Initially it was supposed to be simple, a fresh coat of paint but as I started to paint, it began to flake. I didn’t want the hassle of puttying the troubled wall or calling the professionals. Then I remembered seeing a picture online using scrapbook paper to cover a wall. I didn’t read the post but this paper idea stuck in my mind and I knew I had to try, this is what I did…

What to do?

Select your Canvas

I selected my troubled toilet wall. I did not finish paint it but I did scrape the flaking paint.

wpid-20130416_112517.jpg

Gather supplies

wpid-20130502_1528151wpid-wp-1367530768396.jpgwpid-wp-1367530748006.jpg

  • 12×12 Scrapbook Paper (Measure wall to determine quantity)
  • Mod Podge ( I used 4, 16 oz jars as the adhesive and sealer)
  • Squeegee ( Squeegee is used to press the corners and edges of the paper)
  • Brayer (Brayer is used to smooth the paper onto the wall to eliminate air bubbles)
  • 4″ Brush Applicator (A 4″ brush is a good size to give a smooth even application)

Design

  • Decide on a pattern and lay it out. I went random, just have fun with your paper quilt.

Start pasting and smoothing

wpid-20130416_130951.jpg

  • Pour Mod Podge onto a disposable plate or container.
  • Load the brush and completely apply Mod Podge to a 12×12 space.
  • Adhere each sheet of paper to the wall.
  • Use the Brayer and Squeegee to smooth paper (Pay attention to edges and corners).
  • Continue pasting and rolling till your wall is covered (Some paper cutting may be required)
  • Put a final coat of mod Podge onto the entire surface.

wpid-PhotoGrid_1367845587802.png

Give yourself a clap, smile, take pictures you are a design star.

Enjoy dabbling !

Post by Crafty T (Tameika)